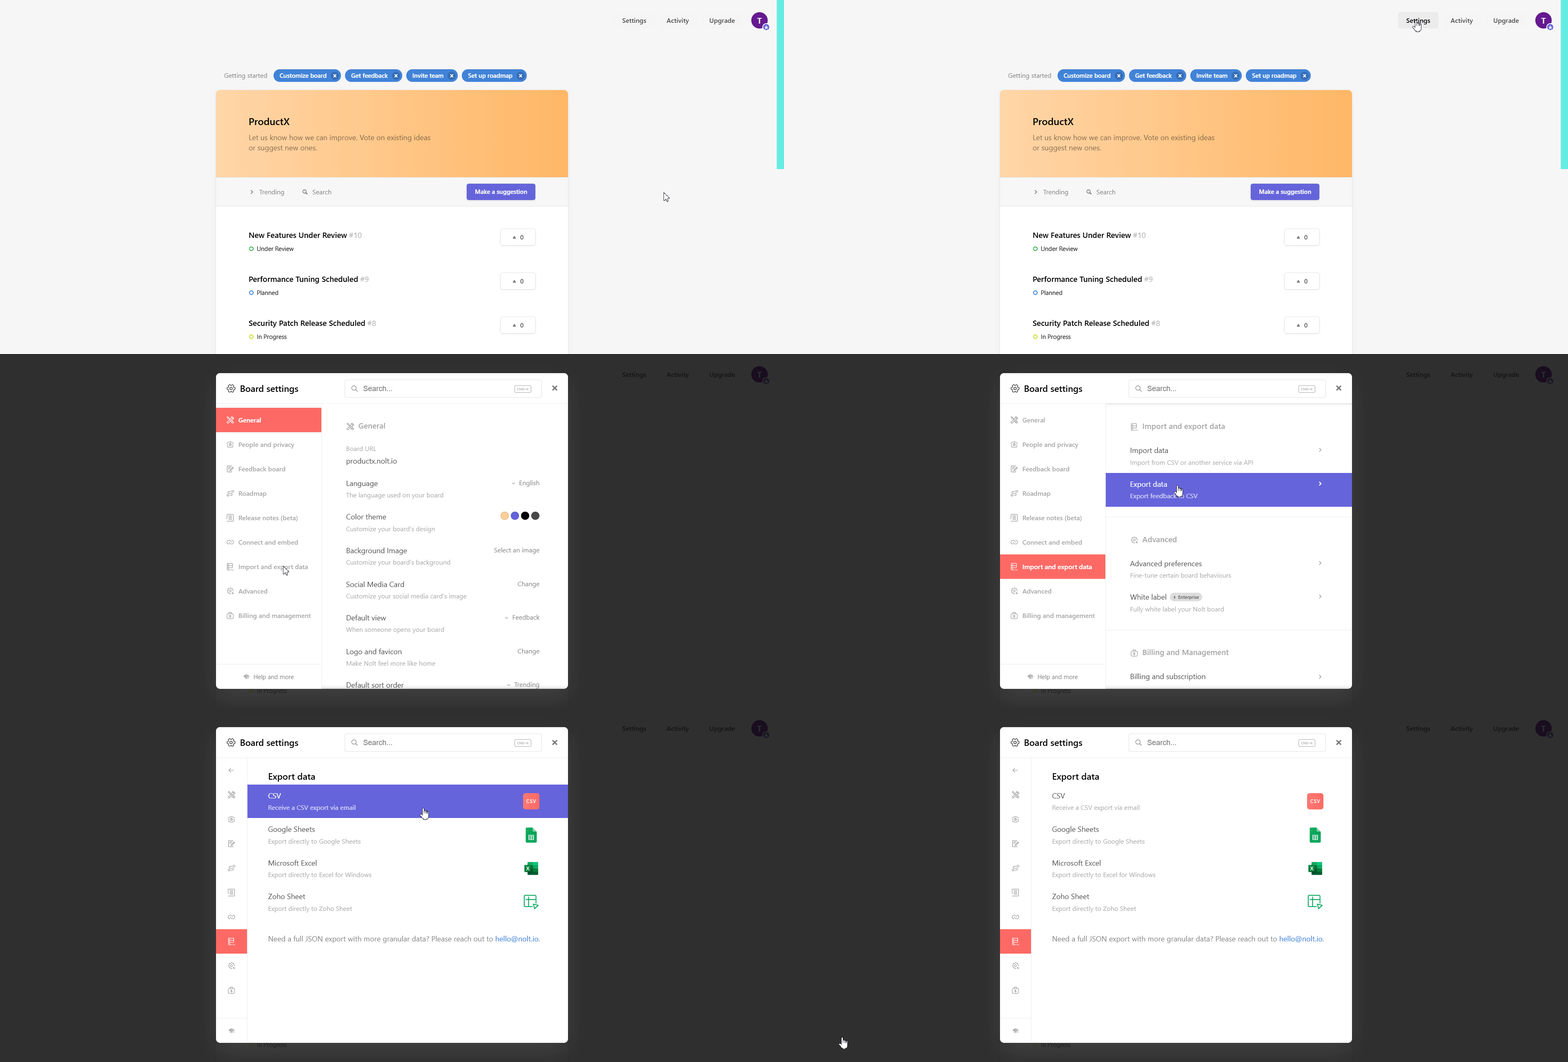
Moving from Nolt to FeedbackChimp is a straightforward process that allows you to seamlessly transfer your feedback data and take advantage of FeedbackChimp’s enhanced customization, integrations, and feedback management tools. This guide will walk you through exporting your data from Nolt and importing it into FeedbackChimp.
Why Migrate to FeedbackChimp?
FeedbackChimp offers a range of advanced features to optimize your feedback workflow:
- Customizable Boards and Categories: Tailor your Feedback Portal to suit your team’s needs.
- Advanced Integrations: Seamlessly connect with tools like Slack, Asana, GitHub, Zapier, and more.
- Data Security and Compliance: Benefit from robust privacy and security measures.
Exporting Data from Nolt
To export your feedback data from Nolt:
- From your Nolt dashboard, click on Settings
- Scroll down to the Import and Export data option.
- Click on Export data.
- Choose the file format in which you want your data to be exported. The file containing your feedback posts, statuses, and other data will be emailed to you.

Importing Data into FeedbackChimp
Once your data is exported from Nolt, follow these steps to import it into FeedbackChimp:
- Navigate to Settings > Import/Export in your FeedbackChimp dashboard.
- Click Import Data and upload the CSV file you exported from Nolt.

- Match the fields in your CSV file (e.g., post titles, descriptions, statuses, votes, and comments) to the corresponding fields in FeedbackChimp.

- Double-check the mapped fields to ensure all data is correctly aligned. Once ready, click Import Data to start the migration process.
- After the import is complete, review your Feedback Boards in FeedbackChimp to ensure all posts, comments, and votes have been successfully transferred.

💡Tips for a Smooth Migration
- Organize Your Data: Review and clean up your feedback in Nolt before exporting to avoid importing outdated or irrelevant posts.
- Inform Your Users: Notify your users about the migration to FeedbackChimp and provide them with access details for the new portal.
- Set Up Boards and Categories: Customize your Feedback Boards in FeedbackChimp before importing data to keep everything organized.
Post-Migration Setup in FeedbackChimp
After migrating your data, take full advantage of FeedbackChimp’s features:
- Customize Feedback Boards and Categories: Use FeedbackChimp’s tools to organize feedback into clear and structured boards.
- Enable Integrations: Connect with Slack, Zapier, Asana, GitHub, and other tools to streamline your workflows.
- Update Feedback Statuses: Assign appropriate statuses to your feedback posts, such as "Planned," "In Progress," or "Completed."
- Engage Your Users: Encourage your users to explore the new Feedback Portal and provide feedback in the enhanced environment.
For additional assistance or inquiries, please reach out to Customer Support.
